Showing posts with label Living Frugal. Show all posts

Frugal Meals with out the Meat

Grocery money is very limited this week so we will be eating foods for "our grocery store". Our meals will constist of alot of beans and sale priced cheese.


Kirk, who has been doing alot of the cooking, has recently discover meatless meals. The meatless aspect is great for those trying to save on the grocery bills.


For lunch, we had sandwiches on homemade bread with fresh veggies from the garden and cheese. No meat! The kids and I have been enjoying these types of sandwiches for years but Kirk has always added the meat. I guess, the unemployment line has created a healthier Kirk!


Make your own McDonalds's Breakfast Sandwich

Homemade Breakfast Sandwich

I have been making these homemade breakfast sandwiches for years now. In lieu of just skipping breakfast, Kirk will grab a couple on his way out the door. The kids will also take them and eat in the van on the way to school. And of course, there is nothing wrong with having a breakfast sandwich for a snack when mom has nothing else prepared in the frig!

I make them in mass quantities and store them in the freezer. It is quite easy, really!:) Just pick up a bag of English muffins or croissants from the bakery outlet store. Or refrigerator biscuits work nice from the grocery store. Search your area to find the best prices or sale items. For those who have more time, English muffins, biscuits, and croissants are actually economical, healthier and taste good homemade.

Once you have selected the bread then top with egg, cheese and meat of your choice. This type of sandwich is handy and simple to keep on hand. And I guaranty, they will make your co-workers drool!

How to Repair or Replace a Window Screen


Mosquitoes and other bugs can enter your home through torn or ripped window screens like this one. Flying bugs can quickly become a nuisance in any home and we try our best to keep them out. I think you know what I mean; sleeping can become impossible with a fly pestering you or a mosquito trying to attack!

Opening the windows is a must in our home. Our house needs the cross ventilation of the cooling breezes to alleviate some of the summer heat. In previous years, we used a small window air condition to beat the heat but opted against this year in order to save some energy cost.

In order to gain use of this window again, the kids and I set off the repair the screen. Screen repairs are quite simple and not time consuming even for the inexperienced like us! These materials were easy to find at the local hardware or home building store. The cost of the supplies is minimal so it is well worth doing the job yourself.

You will need:
New window screen
Screen Spline (rubbing edging)
Screen tool

1)Remove the window screen and lay it on a hard surface large enough to support the entire frame
2)Pull the old rubber spline out and remove the old screen.

Cutting new screen
3)Cut a new piece of material. We used the old piece for a guide.

screen repair
4)Lay the screen on the frame and begin rolling in the new spline
5)Once completed, cut the excess screen with a sharp knife or scissors.


There will be a complete set of instructions on the spline and the replacement screen. This is an easy task so don’t put it off as long as we did. It took less than a half an hour and my kids did a lot of the work. So go ahead, fix your screen and keep those bugs out!


Homemade Laundry Detergent Recipe

LaundrySoap
Homemade Liquid Laundry Detergent

1/3 Bar Fels Naptha Soap, grated
½ cup Washing Soap
½ cup Borax
2 quarts water
2 quarts and 1 gallon water
2 gallon bucket

In a large saucepan, mix grated Fels Naptha Soap with 2 quarts water. Cover and heat over mid-low heat until the soap flakes are dissolved. Watch closely: it will boil over however covering it speeds the melting process. Add Washing Soda and Borax. Stir until dissolved and then remove from heat. Add 1 gallon and 2 quarts water to the bucket. Add the soap mixture and mix well. Mix occasionally over the next 24 hours while the soap cools.

Yield 2 gallons
Use ½ cup of mixture per load.

ARM & HAMMER Washing Soda is a detergent booster which adds cleaning powder to this recipe. Washing Soda helps to neutralize and eliminate odors. It is unscented and contains no water pollutants or dyes. Washing Soda is an all-natural product and an effective cleaner that is safe for the environment and your family. Washing Soda is found in the laundry aisle in some discount store and grocery stores. You can also order it online.
Note: Baking Soda should not be used in place of washing soda, completely different products.

20 Mule Team® Borax is made of 100% Borax, a naturally occurring mineral composed of sodium, boron, oxygen and water. 20 Mule Team® Borax is also safe for washing machines, plumbing or septic tanks. This product is also a laundry boost and it conditions water. So if you have soft water, you may find that you only need 1/3 cup 20 Mule Team® Borax in your recipe. 20 Mule Team® Borax is also found in the laundry aisle usually high or low on the shelf and an easy find at discount store like Wal-mart or your local grocery store. It is available through internet stores also

Fels Naptha Soap is made by Dial Soap Company and also found in laundry aisle. In my area, this is more difficult to find. I purchase it from a farm supply store that carries general household goods also. I have also seen it at a small Mom and Pop type grocery stores. Just look around in the laundry aisle as you are doing your regular shopping, you should be able to find it. Ivory Soap bar would also be an acceptable solution.

Essential oils can be added for additional scent although they do impact the cost. I prefer to save them for the vinegar rinse.

Keeper / Moon Cup, an alternative to tampons and pads

The Keeper Logo

Did you know that over 12 BILLION pads and tampons are USED ONCE and disposed of annually. That creates alot of garbage in our landfills, beaches and everywhere else they may end up.

Well, here's a solution "The Keeper". It is an internal reusable menstrual cup that is an alternative to other feminine hygiene products. I have been using this product for close to a year now and I love it. It is healthy, reusable, convenient and environmentally friendly.

It took me about two cycles to get used to it. I was accustom to tampons for so many years but this product is great alternative. Once in position, it can be left in place for a longer time than a tampon. I don't need to worry about changing in public restrooms. Also there is no waste, my husband can't even tell when I have my period anymore! Well, the moodiness does give it away but he still has to take a guess!


Chart Comparing products

With my daughter quickly approaching her menstrual years, I plan on ordering another one in the smaller size for her use. I can make this one time investment that will meet her needs for years to come!

Also they have this great tell a friend offer. You can earn $5.00 for each new referral. So check out their website and if you decided to order one, here is my info.

Referral Name: Stacy Hugh
Customer ID Number: C5521J.

Then the referring offer will be extended to you!

Images are property of www.keeper.com

An update on the Urban Gardening


Our little garden is coming along nicely. It is so fun to watch the plants grow and mature. Each day I spend a bit of time outdoors weeding, watering and letting the hyper hounds play outside. Chase and Jaden both have harvested a pea pod and are waiting for more to grow! They have also been picking and thinning the little carrots. I am waiting for the green beans, it won’t be long now!


We have had excesses rain lately and more on the way. I took these pictures in the am and there was so much cloud cover it actually looks like evening. One of the tomato plants looks really sick most likely drowning. It is in a low spot and that is actually the second one I lost in that location. Kirk and I decided to build up that part of the yard later in the fall once the plants are done. The good news is I have four voluntary tomato plants growing the raised bed. Last year, we didn’t clean out the bed before freeze up. That apparently left seed in the ground that sprouted and grew into new plants this year. Out of four plants, three are of nice size and flowering. They should have a good chance of producing some fruit! Yahoo!


I thinned the lettuce in the container box. The thinnings make good eatin’ too! Lettuce has shallow roots and so this broken Sterlite Under the Box is working wonderfully. It dries out quickly though so watering is very important. We also have a couple of lettuce plants in the ground that we have actually been harvesting.

Blueberry Bush

And there are even a few blueberries on the blueberry bush we planted this spring!

Save Vegetable Water for Money Saving Soup

Here is a kitchen tip for saving money and still eating healthy.

The next time you make vegetables for a meal save the water and store in the freezer. Keep adding new vegetable water to the container until you have enough to make a batch of soup.

Viola! Great flavor and vitamins right out of some thing you would have just thrown away!

Prepare Tender Dry Beans using the One Hour Soak Method

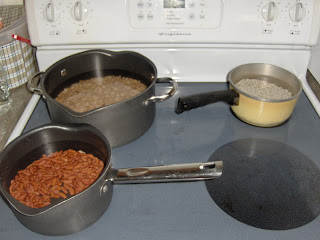
kidney, navy, pinto beans in pots
This month my grocery budget is really getting the squeeze. This happens from time to time in my household. It is one of the reasons why we stock up on sales and other dry goods. We most likely will be eating out of our grocery store for the rest of the month. The large quantities of beans, wheat, rice and some misc freezer items along with a few fresh vegetables from our garden with keep us fed until the grocery cash is following again.

Dealing with dry beans has not always been easy for me. My mother always made such wonderful baked beans while mine always seemed to be a gamble. Would they be hard or would they soften up? Could I serve them to company or take them to the potluck? In fact, I was once told that some beans just don’t soften and doesn’t matter how long you cook them. Well, I no longer believe that because it is all in the method! I gave up overnight soaking and have been using this method of preparation for about a year now. Here is the best way I have found to prepare beans no matter how long they have aged.

2 ½ cups of dry beans or about 1 lbs
2 quarts of cold water

First rinse and sort the beans. Transfer the beans to a pot add the cold water and cover with a lid. Bring the beans to a boil, reduce the heat and simmer for 3 minutes. Turn off the heat and let stand for 1 hour. Next bring the water level back to the starting level by adding hot water and replace cover. Bring the beans to a boil again, reduce heat and simmer for 3/4 to 1 hour. If the beans are fresh, they won’t need to full hour in order to become tender. If they are well aged, it may even take a bit longer just watch them closely. Once the beans are tender transfer them into a jar and store in refrigerator until ready to use in your favorite bean recipe.

Saving Water While Washing Dishes

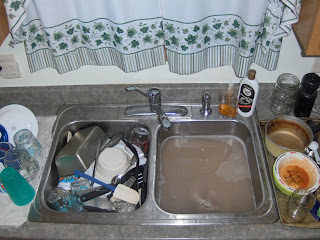
Sink with dirty dish water

We live in town and pay for the water used our household. Then the sewer charges are calculated off the amount used. So basically, we pay for water in and out even if it doesn't leave through the sewer lines! I know we need water but paying a water bill is still fairly new and bothersome to me.

No automatic dish washer here, I wash dishes by hand. Cooking from scratch most of the time creates many a dirty dish! So I try to save on the dish water as much as possible.

I hand wash my dishes and stack them on the empty side (left side of the picture) of the sink. Once the water is dirty, I rinse ketchup plates, lasagna pans, chili bowls, the Foreman Grille or any other messy items and place them back on the dirty side. By rinsing the dirty dishes in the dirty water, I can really maximize the next batch of clean dish water. The water stays cleaner longer allowing me to just keep on washin'. :)

The next step is to rinse the clean dishes. While filling the dish water for the next load, I rinse the dishes from the left side. The water can not be running wide open for this. The sink ends up half full before I am done rinsing. I usually use only about 1/4 of the pressure available. (It is amazing how much clean water is drained down the sink just for rinsing.) Then I stack them on a clean towel laid on the counter top to dry. Once dry, the children are responsible to put them away.

It always feel sooo good to have all the dishes done and put away at the end of the day. Unfortunately, that doesn't happen in Hughville very often!

Looking back on the Cloth Diapering years

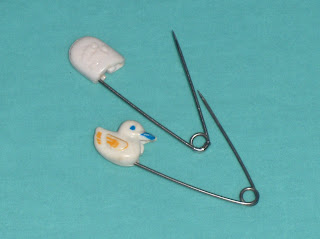
Pins for Cloth diapering

We were cleaning out the garage this past weekend and found these--diaper pins! I have no idea why we would have put them in a bucket of screws but I quickly rescued them! They are probably the only remnants left of my cloth diapering past. Quickly approaching their teen years my children now speak of sex, pubic hair, hair removal, tampons and why testicles don't flow through to the other side of the sack! Ugh! I have no answer for that last question; any advice would be helpful there!

It seems like a life time ago since my days of young motherhood. Following in my mother's footsteps, I made the choice to cloth diaper all my children. Some of the benefits included financial savings, reducing waste in landfills, no nasty smelling garbage can and a healthy child's bottom! In fact, Dana had rashes quite often from the perfumes in disposables and cloth diapers where about the only diaper possible for her delicate skin! I used a diaper pail from a garage sale, Gerber prefold diapers, rubber/vinyl pants, and pins all from Wal-mart. I also bought pink and later blue package of wash clothes that were specifically for diaper clean ups. This probably is still the cheapest method for today.

Even though I had two children in diapers at once, I didn't feel that it was that much work. Wet diapers would go directly into the dry diaper pail and poopies where rinsed or plopped out in the toilet. Kirk never found the rinsing out part tolerable and so he would leave poopies for me. Sigh. I washed diapers and wash clothes together at least every other day and used the outdoor line for drying. When the diaper pail was empty, it too was washed and air dried. Oh, and it wasn't unusual to find a pile of clean diapers lying on my couch waiting to be folded.

Modern cloth diapering has come along way. Wow, you don't even need pins anymore! A quick Google will show you a list of modern cloth diapers websites. I am no longer an expert on cloth diapering however I thought this site offers many choices so you don't have to cloth diaper the way mom (or I) used to! www.greenmountaindiapers.com/

I wouldn't change my cloth diaper past and if blessed with another baby today, I would do it all again. So enjoy your diaper years with your young child because time slips by so fast...

Using Buckets for Long Term Food Storage

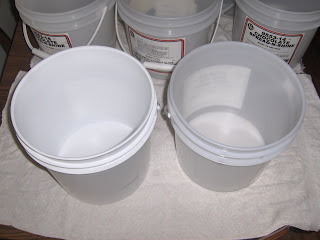
Food grade buckets
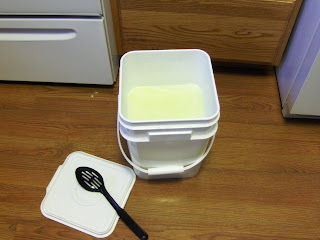
Food grade 5 gallon buckets with sealing lids are excellent for storing dry goods. They keep out vermin, are hard to puncture and the seal is air tight. Bakeries will often have these types of buckets left over from large quantities of frosting or jelling filling. Delis may also have them from items like potato salad. Some stores will just give them away, others will charge you for the bucket. I know you can also find them on Ebay and food co-ops carry them but be prepared to pay more. From my experience, it is best to just be patient and shop local for this item.

I called around this am trying to locate some additional buckets for my dry goods. After six calls, I was able to locate six buckets. Five for free and one for $1.00! Also I added my name to the Walmart Bakery list for five buckets when they become available. One small Bakery was charging $2.50. I thought that might be a little much so I passed it up.

Why so many buckets?

I have been buying dry goods in large quantities and storing for later use. Some weeks cash is short therefore I need to keep food on hand. And other weeks, there just isn't much to my liking on sale so I don't shop. Dry beans, oatmeal, popcorn, sugar, rice and wheat varieties all store well in these buckets. Some food can be kept for a really long period of time. For example, dry beans stored in a dark cool places will last eight years or more! And with constant price increases it maybe better to invest money in food rather that the stock market! :)

Anyway in my quest for these buckets, I discovered that not all buckets are created equal. The five I picked up for free where more cloudy like an ice cream bucket not solid white like my previous buckets. That means more light will flow through into the buckets. For long term storage, there needs to be as little light as possible. So I plan on using the cloudy buckets for things like sugar, flour and probably soft white wheat since those items usually last for six months or less around here. I expect that the beans will last longer and will need to be stored in a solid bucket. It will just a little planning however I am still very thankful for the free buckets!

The right way to save on gas

For now, gas prices in our area have seemed to level. Even so I try not to drive much and conserve fuel whenever possible. I came across some old news from UPS today. The company uses software to map out delivery routes which contain the fewest left turns possible. Makes sense to me! Left turns increase engine idle time resulting in engine wear, wasted fuel and additional driver time. Now for a fleet of trucks this leads to huge dollars. But what about you and me?

I know that many of you have already changed the way you drive whether it be running errands less often or having hubby pick-up milk since he is already driving by the grocery store. The price of gas has forced us all to make choices to save but trip efficiency is something that we probably don't think about.

I'll defiantely be thinking my route through the next time I run errands. How about you?

Fixing my slow running computer and other noises

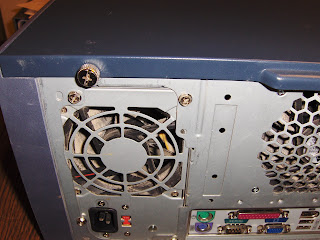
Computer plugged with dust


I turned on my computer this morning only to hear some horrible humming sound coming from the engine (tower CPU). Whenever my computer has a seemed problem, the first thing I do it physically clean it. Since the fans are constantly sucking in cooler air, the blades and interior tend to collect dust bunnies. You can see the vent on mine is quite plugged and the computer is literally suffocating.

To get started cleaning completely shut down your system and disconnect the CPU. If you are not familiar with all the connections, you might want to make some notes. Most computers are color code which makes for an easy disconnect and hook-up. After disconnecting move the CPU to a more comfortable workplace for cleaning.

Your trusty vacuum will help clean your computer fairly well. Also gather any precision attachments that you may have around because they may come in handy for cleaning all the little crevices. Most technicians would probably recommend a can of pressurized air but I have found my vacuum to be sufficient and less costly. A good starting point is to suction out the vents and any port openings on the exterior of the machine. Suction the face around the CD drives, SD drives, UBS ports and whatever else. Then move around do the back suctioning around all those little ports.

Screws on back of CPU

Then find the two screws that hold on the main cover plate. The screws should twist off easily with your finger. Remove and place them in a safe spot. Then gently slide the large plate cover off. Once removed, you will see the inner- arts like the motherboard and memory card. Very carefully vacuum around all the small parts and fans. After a careful and thorough removal of the dust and dirt, then slide the plate back on, tighten the screws and hook-up all the wires.

A technician gave me this know how when my computer was running so slow and seemed bogged down. Since it was about five years old, I was deciding if I should just buy another tower. He suggested cleaning it because generally it is a heat issue. Computers generate a lot of heat. If they can’t ventilate themselves, the processor will just slow down to prevent further damage. Now I do this about every two months and it is just amazing the amount of lint, pet hair and dust particles that accumulate over that short period of time. This simple task of regular cleaning keeps our 6+ year computer running adequately.

A homemade toothpaste recipe


Here is a great toothpaste recipe to use the next time you find your favorite store bought tube is empty. My kids like store bought toothpaste best but I don't like all the nasty ingredients. The kids use free sample when possible but to fill the gaps between free samples and still save money this is what we use. I think it works quite well and so does hubby. We have been using this for over a year now actually our dental check-ups have improved. It is so simple to whip up that we usually delegate the chore to the kids.

3 part baking soda
2 part Glycerin*
1 part salt
1 part flavor: peppermint, spearmint, or mint.

The peppermint is what gives toothpaste the “spicy” that kids don’t like. We usually do a mix of peppermint and mint which seems to keep the whole family happy.

Store the toothpaste in a sealed container. Rubbermaid makes a mini-round that is small and compact which is a convenient place to store this homemade toothpaste.

I truly don't know the shelf life. I just grab a spoon out of the kitchen draw and use it. Generally we make the homemade toothpaste about twice a week. It would be best to adjust the size of your parts to your family's needs in order not to have too much.

*Glycerin is found in drug stores and some Walmart pharmacy sections. It is often used as a skin protect ant for dry hands and lips. I have also seen recipes where coconut oil is used in place of the Glycerin.

Looking for a free sample of toothpaste? Here you go!

https://www.timeinc.net

Drying Clothes on the Outside Clothes Line

Clothes on the Line


It was a perfect day for line drying: the weather was warm and sunny with a slight breeze!

Kirk and I put up these clothes line poles last year. I had not had an outside line for nearly seven years! And now I use the line almost everyday and I have unplugged my dryer for the summer.

Our house is not convenient for outside line. I actually need to carry the baskets quite a distant. For that reason, I will often wash all my laundry for the day and head out only once with all my wet clothes. I will often enlist a young one to help me carry baskets. Today we washed four loads and quickly filled the lines.

You can sometimes find clothes line poles for free. They are many people who don't use their poles so spread the word that you are looking. Local tradio shows or small paper want ads are a great place to start. I had three return calls when I advertised and these were given to us. We just had to dig them out!

The Rising Cost of Ice Cream and Gas

Jaden
I guess all my complaining about grocery and gas price are rubbing off on my youngest son!

Jaden and I were shopping at the “little grocery” store today. A small store located a few blocks from our home which usually has good sale prices.

Anyway we were glancing through the ice cream freezer section for the $4.79 vanilla bucket on sale. Jaden stopped at the chocolate revel flavor and comment how he would like that kind. He quickly noticed the price and stated “I can’t get that can I? It is not the one on sale.” I quickly showed him the sale bucket to grab and we stepped away from the ice creams. To avoid impulse buying, I never linge to long in one section. Grab your item and go!

As we walked away Jaden proceeds to discuss the prices. “Was that ice cream really $7.89? Mom, that is about as bad as the gas prices?”

The face on the lady next to us lights up with a smile and she stated “I agree!”

The latest proof they really are listening!

Gardening in small spaces

Kirk and Chase
We spent the day revising our current raised flower garden bed. We built the plot last year for just ornamental flowers and a place to feed the birds. There was also enough space for a couple of tomato plants and some lettuce. Well this year, I have more time to spend gardening and caretaking for plants so we wanted more fresh garden vegetables. Gardening is also one of Kirk’s previous passions; he really enjoys spending the evenings in the garden. Our problem was the yard area or lack there of. It is not very large and we didn’t want to give up a lot of space because the child and hyper hounds need a place to move and run around.

First we expanded the existing bed by adding more to the east with some bricks that we still had from last year. The addition reduced some of the walking space between the bed and the clothes line pole. However, there is still plenty of room to walk through without getting clothes-lined!  The dirt in the bed was terribly hard, lumpy and difficult to work with so we mixed in sand, peat moss, and some new topsoil. The kids mixed, turned, pulled and pushed mixing the new additions with the existing dirt that Kirk had previously tilled. Once it was full, Kirk came back through and tilled again. The new mixture was a tremendous improvement to the quality of the soil.

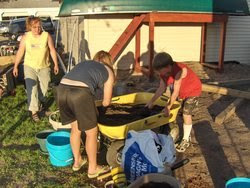
Family mixing dirt

Next, we mixed up equal parts of new topsoil, sand and peat moss in the yard wagon to fill large pots and other containers. We will be trying some container garden this year. Containers will help up utilize the limited space that we have. And since we got a late start at this, I am hoping we will be able to bring container pots in and keeping them going late into the fall.

We also planted green beans around the fence posts and peas in a small wasted space between the property line and the other clothes line pole. Urban gardening on small ground does create some challenges however I was amazed that amount of wasted space we did find once we started looking. Oh sure, I won’t have enough produce to do much canning or freezing but we will have some fresh organic vegetables and the kids are learning a new skill. And that absolute best part is…we did it together!

Thanks for all your help today, kids!

Reusing plastic grocery store bags in the kitchen garbage

Kitchen Garbage Can
Since we recycle and compost, I have a smaller sized can for garbage in the kitchen. The plastic bags from our local grocery store fit nicely but Wal-mart bags are just a tad too small. The mouth of the bag doesn't quite fit around the rim of the can and sometimes fails in making a mess.

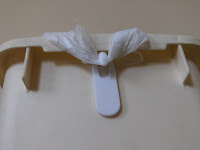
Hooked bag

I picked up a bag of little hooks for $.25 last week at a yard sale but our dollar store also carries them. The Commands are nice but pricey. I save them for the cupboards, walls and valuable items. Anyway, I attached these little hooks to prevent the bags from falling down inside the can.

First I cleaned the plastic can thoroughly with a small cloth and rubbing alcohol. Then I attached the hooks upside down on the outer edge of the rim. Now when a bag is just a bit to small, I can link it around the upside down hook and the side will stay up.

Another option would be to attach the hooks right side up on the interior of the can. It all depends on the size of the can verses the size of your bags you are dealing with. Adjust accordingly to your situation and the bag will be held upright in correct position.